Sunday, July 24, 2011

E-Reader case

Well I did it! I made my first E-Reader case today and I have to say I like it. Next time I will make the front tab a hair smaller (I used the wrong tab pattern) but it's fine for now.  I also plan to head to Sew Much More tomorrow and get a perfect large hand made button to put on the tab where the stitches are from attaching the Velcro. I got the pattern from Sew Much more and it's by Whistlepig Creek Productions  - the pattern is #1203 E-Cozy. 

Those of you who know me will understand my choice of fabric....... Go Texas!


The Texas Cover!
Front
Inside
Back
The pattern is quite easy to follow and requires firm interfacing throughout so the end result is a stable protective case for my brand new E-Reader.  Can't ask for more. 

Ciao for now,

Michele My Belle

Saturday, July 23, 2011

E-Reader surprise for me!

It's my 7th anniversary with my adorable sweet husband and I'm the luckiest lady around!!

Well, so our anniversary isn't until tomorrow - July 24th - but my husband surprised me today and left my present hidden under my project I was working on. Somehow he hid it when I went out to the laundry room to put a load in the washer. I didn't even see it for a couple of hours because I was busy typing up my last blog post and as usual had several things going at once. So at one point while some pictures were downloading to my Picnik account I went back to the coral pleated clutch I was working on I saw a small rectangular box on my table. At first I couldn't figure out what I had put there and just as I picked it up and asked my husband if he put this box on my table I saw an even smaller box and it was clearly a new box of my favorite perfume - Victoria Secret Vanilla Lace! Then I figured it out, these are my Anniversary gifts!! When I picked up the box I saw Amazon Kindle on it and I jumped up and down and squealed like a teenager who just got asked to the prom by the hunk of High School.

My hubby got himself one too and he set us up as one account so we can share books that either of us download. Wow, he thought of it all. Oh, and the best part? I get to make us each a cover & carrying case!!  I want to stay up late and start but we have Church so early in the morning I better not.

All you lurkers out there please chime in and help me with any hints you may have on making an E-Reader cover & carrying case. :D  I love tips and tricks and I'll share back!!  I do have several patterns I can pick from but he wants his case made of a neoprene material and I haven't worked with that before. So, any hints on neoprene will also be greatly appreciated.

Ciao for now,

Michele My Belle

Easy to make sew-in labels

This tutorial is for those of you who love to sew your own creations either for a loved one or to sell on Etsy and want to put your personal label on each item. If you have priced the fancy woven labels lately you know how expensive they can be and for the small store owner or as a gift giver it is not a reasonable expenditure. I am in both those categories so I went out to find an economical way to make my own labels with the option to personalize every single label exactly how I want.

I went online and read many tutorials on how to make a personalized label to sew on my creations and each article/tutorial I read gave me a little more of an idea of how I want my labels to look. Like most of my creations this is a process of much thought, some planning and even more evolution.  After I made them I decided I ought to share what I did so others can add this to their arsenal of ideas.
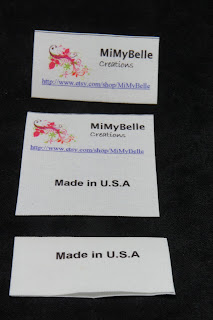
Top label is the front, middle is how it prints out before folding, bottom is the back side of label when it is sewn in.


Items needed:

1) Ink jet printer
2) June Tailor Sew-in Colorfast fabric sheets (see pic)  
3) Software program of your choice to make your label (I used Microsoft Word)

Steps to create a personalized sew-in label:

To me the first step is always the hardest - designing the label to look exactly like what I have envisioned in my  mind. With my label it took me quite a bit of trial & error and a lot of editing to get the final product, so don't be discouraged if you have to keep making changes. You want it to look professional and clean and that takes time. I started out with just "MiMyBelle Creations" on the label and then added the URL to my Etsy store store at the bottom but that wasn't enough so I threw in my logo design too. Then I thought I would get fancy and put  "Made in U.S.A" on the back side of the label. That took the most time because I had to get the Made in U.S.A aligned perfectly so when the label was folded in half the top & bottom sections were in the right place. Whew..... Oh, then later on I decided I better put Made in Texas just in case it matters! Besides, Texas  is the best, right?!


Oh - and the flowery design on the left is my logo I use on all my tags & labels so I had to shrink it really, really small to fit on the label and at the same time keep it proportional. To do this and add the words on the right side of the logo I divided each label in to two rows and then divided the top row into two columns. Make sense?  If not then look at the picture below and see what I'm talking about. 


Here is a screen print of how I made columns at the top to separate my logo & company name. Then I aligned the URL on the bottom up high and "Made in Texas" at the bottom.
 
For those of you who don't know how to make rows & columns here's a quick tutorial (If you know how to do tables then you can skip this part) - The first step is to decide how wide you want your labels to be. I measured a bag I made and decided the labels should be about 2" wide and 1" tall. Then I went to Microsoft Word and started a new document and inserted a table.


Now you have to decide how many tags you can get across a page and down it. In my case you can see I was able to get 3 labels across and 4 rows down so my table will be 3 columns (across) and 4 rows (down).

Now, if you don't want a two sided label and you choose to make it smaller than mine you will increase the number of columns & rows to get the look you want. But, for now I will continue with what I did. Next I split each label square on the screen. This is done by putting the cursor in a box and right clicking the mouse. Then select "split cell" and plug in how you want to split it (in rows or columns) - initially I split each box into two rows making one row for the front and one for the back. 


This is what the cells looks like after I split them into two rows
 Now I have 8 rows - 2 for each label, that may not make sense now but if you think of what you need to type on each label there is a log. Now I have to split the top row of each label (each is made of 2 rows) so I can put the logo in one box and MiMyBelle in the other box. (see below)

  So far we have laid out 12 label blanks and now we need to fill in our design(s) and words. We are getting close to getting the final product!! I told you the layout portion takes the longest - now let's hope the design layout matches what we envisioned it to look like! 

I have my logo design saved in a folder on my computer because I use it all the time so that will be easy to find, the next part is what do I want typed on the label? I decided the company name on the right of the logo design would look nice - but I also want the web address to my Etsy store. This will fit perfectly at the upper portion of the bottom section so when I fold the label it will be at the bottom of the front and the Made in Texas will be in the same lower box but  placed lower so it will be on the back side only. 

Here is how you plug in a picture you have saved in your documents:
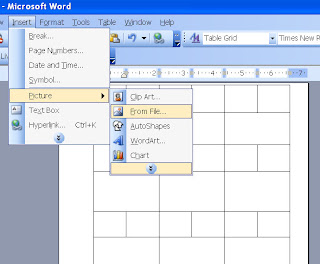
If you have saved your logo design and any other items you want on your label this is how you insert it into the box. Most of the time you will have to re-size the picture to make it fit correctly.

As you will find out, when you are typing words, inserting pictures you will need to reposition these within each section after some changes. Then, once you have it looking just they way you want I STRONGLY suggest printing the file out on paper in draft mode. After it prints out go ahead and cut out one row of labels and fold them (if you choose to have a folding label) and see how it looks. If something doesn't look just right go back to the file and tweak it as necessary until you get it perfect.  Then be sure to save it! Of course as with anything you are working on you want to save it frequently and often! ( Get the point?!)

Now that you have the label set up in it's final form it's time to print it on the fabric sheet! Take a deep breath and double check your work one more time.  When you are ready to print simply put the fabric sheet  in your printer according to the instructions only be sure you are not in draft mode. After it finishes printing lay it on a flat surface, with the print side up, and allow it to dry at least 10 minutes. After it is dry remove the paper backing (this is what allows it to go through the printer). Turn your iron on the highest setting, usually cotton, with NO STEAM and iron the image, face up, for 1-2 minutes to set the ink. The instructions go even further to tell you how to colorfast treat the labels - if they have any chance of being washed I highly recommend you follow this step as well. 

The instructions on the package state the labels can be washed by hand or machine in cold water if the colorfast treatment was done - only do not use detergent. That part scares me so I don't put these labels in anything that may possibly get put in the wash and if I think it will get washed I include a little note letting the new owner know so they won't ruin their item.

Now you are ready to go out and make your own awesome personalized labels or tags. These fabric sheets are great for so many other things including making a pillow, quilt or shopping bag using one or more of your favorite photos! If you go to June Tailor Creativity Center you will find lots of great projects. 


Ciao for now,

Michele My Belle

Saturday, July 16, 2011

Cards & tags to promote your products

Product labels

When I make a creation I am proud of I can't wait to either give it as a gift or put it on my Etsy Store but I also want to get the word out about my creations. I am sure many of you have had the same thought and have done something about it such as made your own label, purchased some generic labels or ordered a personalized label. Since I was just starting out I decided to make my own sew-in labels. I used June Tailor Colorfast fabric sheets for ink jet printers. They came out really nice and the package says if you follow the directions the labels are washable though I have not tested them yet because they are in items that are not normally washed. These labels are not only a great and inexpensive way to make sew-in labels for your handcrafted items but also an easy way to make quilt labels.

Picture of my label in a snap bag

 Mini business cards & Thank You cards

When I thought about the best way to market my Etsy store and the items I made I found Moo Mini cards at Moo.com and I just love them! Their site is so easy to navigate and I was able to upload any of my own photos as a logo and several lines of  text. At the time I didn't know what logo I would start using for MiMyBelle Creations so I uploaded a picture of a quilt I made and I choose to put my Etsy store URL and a little note of thanks for purchasing my item.  The front of the mini cards I chose are from a set they offered with geometric shapes and flowers in a beautiful range of neutral colors. I recently went back to see what new designs they have and there are SO many more! I also decided I need some sort of "Thank You" tag to attach to the items I ship. So, I made them using card stock and my own logo design. I printed a whole page of them and simply cut them out as I need them .Here is one example of what I do with the mini cards and the thank you tags I've made when I ship a product from my store. I punch a small hole in both the mini card and the thank you card and tie it to the package with raffia.

Small thank you tag & Mini Moo card (back side)

Back to the Mini Cards - there are so many options to design the front of the Moo mini cards - you can upload your own images (up to 100 different images) or personalize their ready made designs. They also make TEXT cards with your company name, sayings and other really cool ideas.  What a GREAT way to show off your products, portfolio or blog! There are many other items to be made at Moo besides the mini cards so check them out and see their creative ideas section it will get your creative juices flowing!

Homemade stickers

 I also designed my own stickers to seal closed the tissue I wrap my items in before shipping - those are adorable!  I chose to design these on Microsoft Publisher because it allowed me to do what I wanted, however there are other programs that would work as well.

To make my clear stickers  I simply used a product found at any office store or even Wal-Mart - they are from Avery and called "Clear Sticker Project Paper" and comes in a package with 3 sheets of 8 1/2" x 11" of clear sticker paper. All you do is design your stickers on your favorite software and print it out on in the inkjet printer. You can even design multiple designs & sizes all on one page! I can see using these to make personalized stickers to label or decorate gift wrapping at Christmas or put on the back of an envelope when mailing a birthday or holiday card. The uses are only limited to ones imagination.


Avery Clear Sticker Project paper
My logo on a sticker and used to seal back of package

 Professional stickers

Then after I made my own stickers using the above sticker paper I decided to try Zazzle.com stickers. This is the coolest website ever! If you haven't checked out Zazzle then add it to your list of must visit websites! You can design just about any product with your own designs/pictures or use one their many, many designs which include popular icons such as Harry Potter or current trends of the day. WOW, I could spend days and days on this website alone. I even started making my own products to sell. Yep, another place to sell your creativity. Here is my store (I know, it's pretty bare - but remember I just started.MiMyBelle Zazzle store.
Here are my snazzy labels from Zazzle


I think these look really nice! There are a few differences between theirs and the ones I made -  mine have a clear background and these are a solid white background,  and the Zazzle labels are a 1 1/2" circle and I made mine in a square shape - even though I can change it to any shape I want on the next print!


I hope you find this information helpful and if anyone has more ideas to share please let me know - I am always looking for new and creative ways to show off my hard work!

Ciao for now,

Michele My Belle


Saturday, July 2, 2011

Clutch purse or Diaper clutch

I found a wonderful tutorial for an absolutely gorgeous gathered clutch on Noodlehead blog so I had to try it and I found it to be very easy.  I made one and then decided I needed to adjust the pattern so I could make a diaper clutch for a friend of mine who just had a baby.  I am very pleased with both!


Here is the purse clutch I made


I even used an invisible zipper adding to the classiness! (Is that a word?)


And this is the diaper clutch I made 


It measures about 10.25" by 6.25" and  has a wrist strap for easy carrying. It is elegant enough to be an evening bag and double as a diaper/wipe clutch so any trips to change a dirty diaper in public go unnoticed!

  I hope she enjoys it as much as I did making it.  I think I'll make a few more tweaks and post another tutorial....

Ciao for now,
Michele My Belle
Related Posts Plugin for WordPress, Blogger...