This tutorial is for those of you who love to sew your own creations either for a loved one or to sell on Etsy and want to put your personal label on each item. If you have priced the fancy woven labels lately you know how expensive they can be and for the small store owner or as a gift giver it is not a reasonable expenditure. I am in both those categories so I went out to find an economical way to make my own labels with the option to personalize every single label exactly how I want.
I went online and read many tutorials on how to make a personalized label to sew on my creations and each article/tutorial I read gave me a little more of an idea of how I want my labels to look. Like most of my creations this is a process of much thought, some planning and even more evolution. After I made them I decided I ought to share what I did so others can add this to their arsenal of ideas.
 |
| Top label is the front, middle is how it prints out before folding, bottom is the back side of label when it is sewn in. |
Items needed:
1) Ink jet printer
2) June Tailor Sew-in Colorfast fabric sheets (see pic)
3) Software program of your choice to make your label (I used Microsoft Word)

Steps to create a personalized sew-in label:
To me the first step is always the hardest - designing the label to look exactly like what I have envisioned in my mind. With my label it took me quite a bit of trial & error and a lot of editing to get the final product, so don't be discouraged if you have to keep making changes. You want it to look professional and clean and that takes time. I started out with just "MiMyBelle Creations" on the label and then added the URL to my Etsy store store at the bottom but that wasn't enough so I threw in my logo design too. Then I thought I would get fancy and put "Made in U.S.A" on the back side of the label. That took the most time because I had to get the Made in U.S.A aligned perfectly so when the label was folded in half the top & bottom sections were in the right place. Whew..... Oh, then later on I decided I better put Made in Texas just in case it matters! Besides, Texas is the best, right?!
Oh - and the flowery design on the left is my logo I use on all my tags & labels so I had to shrink it really, really small to fit on the label and at the same time keep it proportional. To do this and add the words on the right side of the logo I divided each label in to two rows and then divided the top row into two columns. Make sense? If not then look at the picture below and see what I'm talking about.

Here is a screen print of how I made columns at the top to separate my logo & company name. Then I aligned the URL on the bottom up high and "Made in Texas" at the bottom.
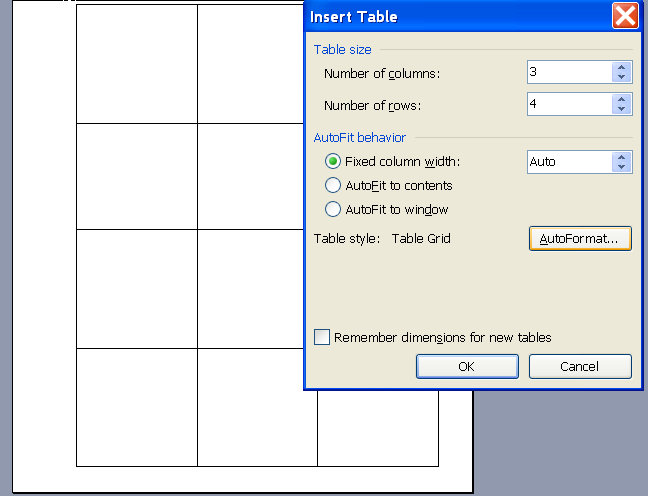
For those of you who don't know how to make rows & columns here's a quick tutorial (If you know how to do tables then you can skip this part) - The first step is to decide how wide you want your labels to be. I measured a bag I made and decided the labels should be about 2" wide and 1" tall. Then I went to Microsoft Word and started a new document and inserted a table.

Now you have to decide how many tags you can get across a page and down it. In my case you can see I was able to get 3 labels across and 4 rows down so my table will be 3 columns (across) and 4 rows (down).
Now, if you don't want a two sided label and you choose to make it smaller than mine you will increase the number of columns & rows to get the look you want. But, for now I will continue with what I did. Next I split each label square on the screen. This is done by putting the cursor in a box and right clicking the mouse. Then select "split cell" and plug in how you want to split it (in rows or columns) - initially I split each box into two rows making one row for the front and one for the back.


 | |
| This is what the cells looks like after I split them into two rows |
Now I have 8 rows - 2 for each label, that may not make sense now but if you think of what you need to type on each label there is a log. Now I have to split the top row of each label (each is made of 2 rows) so I can put the logo in one box and MiMyBelle in the other box. (see below)

I have my logo design saved in a folder on my computer because I use it all the time so that will be easy to find, the next part is what do I want typed on the label? I decided the company name on the right of the logo design would look nice - but I also want the web address to my Etsy store. This will fit perfectly at the upper portion of the bottom section so when I fold the label it will be at the bottom of the front and the Made in Texas will be in the same lower box but placed lower so it will be on the back side only.
Here is how you plug in a picture you have saved in your documents:
 |
| If you have saved your logo design and any other items you want on your label this is how you insert it into the box. Most of the time you will have to re-size the picture to make it fit correctly. |

As you will find out, when you are typing words, inserting pictures you will need to reposition these within each section after some changes. Then, once you have it looking just they way you want I STRONGLY suggest printing the file out on paper in draft mode. After it prints out go ahead and cut out one row of labels and fold them (if you choose to have a folding label) and see how it looks. If something doesn't look just right go back to the file and tweak it as necessary until you get it perfect. Then be sure to save it! Of course as with anything you are working on you want to save it frequently and often! ( Get the point?!)
Now that you have the label set up in it's final form it's time to print it on the fabric sheet! Take a deep breath and double check your work one more time. When you are ready to print simply put the fabric sheet in your printer according to the instructions only be sure you are not in draft mode. After it finishes printing lay it on a flat surface, with the print side up, and allow it to dry at least 10 minutes. After it is dry remove the paper backing (this is what allows it to go through the printer). Turn your iron on the highest setting, usually cotton, with NO STEAM and iron the image, face up, for 1-2 minutes to set the ink. The instructions go even further to tell you how to colorfast treat the labels - if they have any chance of being washed I highly recommend you follow this step as well.
The instructions on the package state the labels can be washed by hand or machine in cold water if the colorfast treatment was done - only do not use detergent. That part scares me so I don't put these labels in anything that may possibly get put in the wash and if I think it will get washed I include a little note letting the new owner know so they won't ruin their item.
Now you are ready to go out and make your own awesome personalized labels or tags. These fabric sheets are great for so many other things including making a pillow, quilt or shopping bag using one or more of your favorite photos! If you go to June Tailor Creativity Center you will find lots of great projects.
Ciao for now,
Michele My Belle
Ciao for now,
Michele My Belle
No comments:
Post a Comment